How to remove lines and creases from artificial grass
If you’ve unrolled your new artificial grass and discovered unsightly creases, dark patches or lines, you’re in the right place. Luckily, they’re all very easy to fix. Read on to discover how.
There are a couple of reasons why lines and creases occur in artificial grass.
The first is during the manufacturing process, where the grass is measured and cut. At this stage, a mechanical measuring wheel is passed over the top of the grass to ensure alignment of the rolls. This can sometimes ruffle the fibres of the grass, and cause lines. Then, as the grass is prepared for shipping, it’s wrapped tightly round a cardboard tube, before being secured. A small amount of additional pressure can cause dark patches or lines, so when the grass is then opened at its destination, the grass looks very flat and ‘lifeless’. The backing material will also contribute to any creasing, as once cool, it will mould itself to any shape underneath it.
The second is after installation, when a hot day can cause the backing to expand and contract, causing wrinkles.
What do I do?
Before installation:
First things first – there’s no need to panic. It is perfectly normal for creases and lines to appear, and they are easily remedied.
- Roll out your grass fully and leave it for at least an hour to warm through. Ideally it would be a warm day, as it will help soften the backing, and reduce the severity of the crease or line.
- If your grass is still creased, brush the grass on and around the affected area. If the creasing has occurred near the edge, pull on the edges to stretch it out. Leave it for another 10-15 minutes to settle.
- Then, flip the area over, and pull the area out again. Once you flip the area back over the creases and lines should be gone. Your grass is now ready to install.
An example:
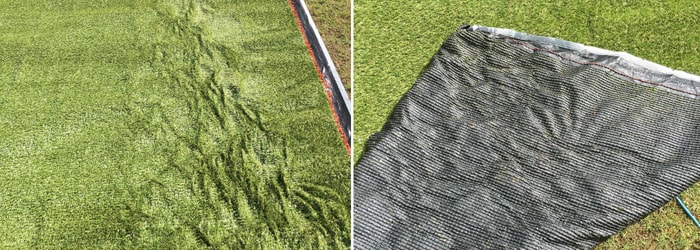
Here you can see a particularly extreme case of creasing – created on purpose to show how easy it is to get rid of it. Also worth noting is how flat and lifeless the grass looks, and because it wasn’t particularly warm on the day that these photos were taken, the grass would not sit flat because of the stiff latex backing. It’s easy to see why someone might panic at this stage, and render the grass useless even before installation, but if you follow these steps, you can get rid of the creases with minimal effort.
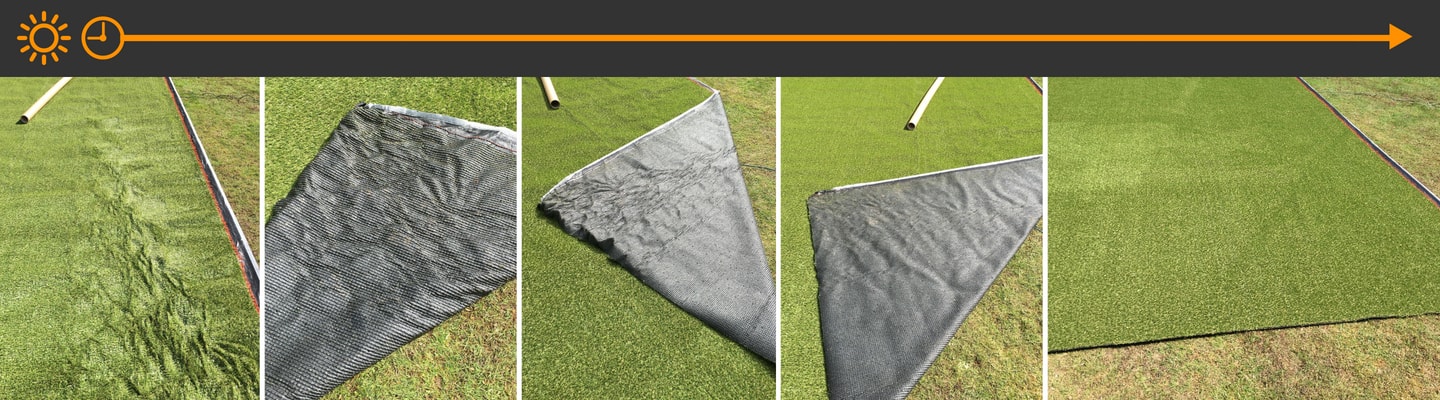
In the image below, you can see how effective this approach is at removing even the heaviest creases. Simply allowing the latex backing to warm in the sun, and pulling it tight again, leaves your artificial lawn looking beautiful and ready to install.
After installation
Sometimes wrinkles can appear after installation. This is usually when it’s been particularly hot, causing the backing to become supple again, potentially stretching and then cooling again and leaving wrinkles. This is prevented with a proper installation, but if you do find these wrinkles occurring, contact a professional installer and they will be able to advise on a refit.